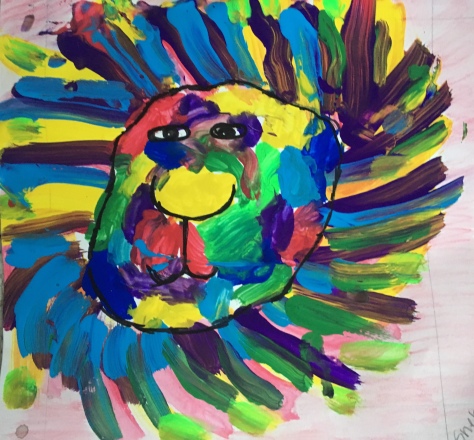
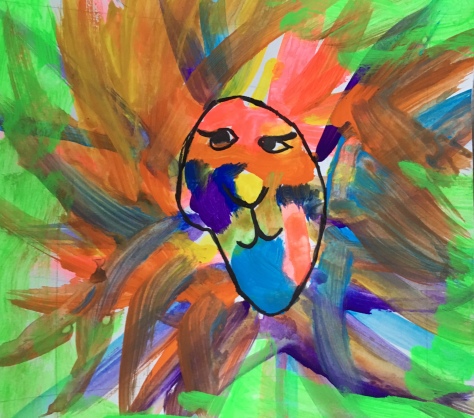
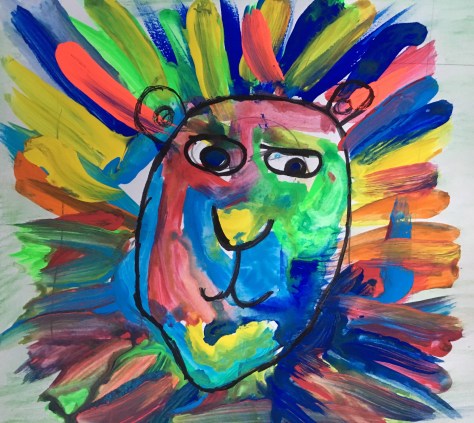
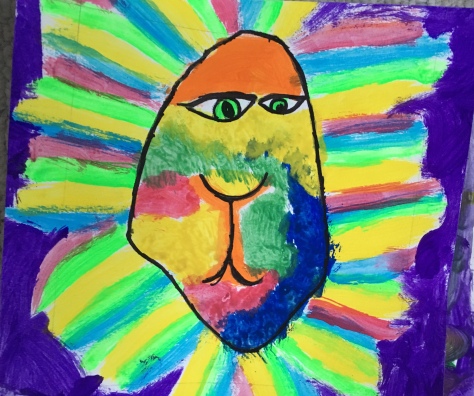
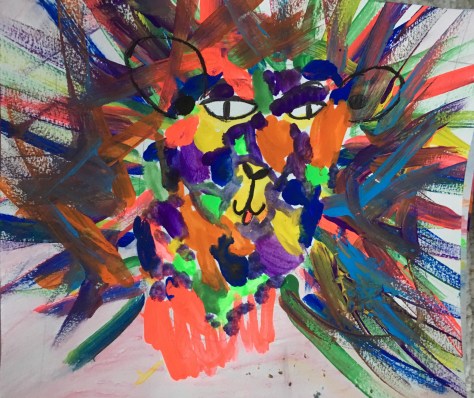
LeRoy Neiman’s lions encapsulate both aspects of the theme perfectly and are bright and bold so fit the criteria for square 1 art projects.
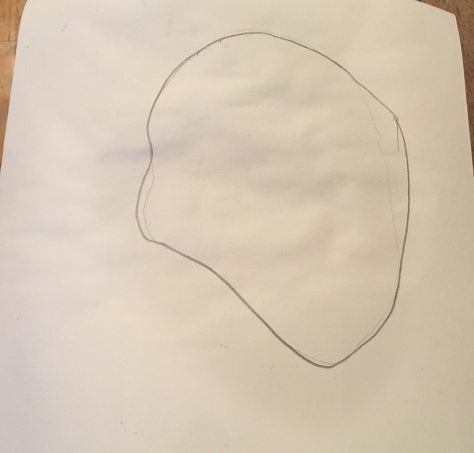
Step 1.
Draw the outline of the lion’s face.
We made sure, the face was a good size and talked about different shapes for the face. This shape was similar to LeRoy Neiman’s lion and makes the lion appear as if it is looking sideways.
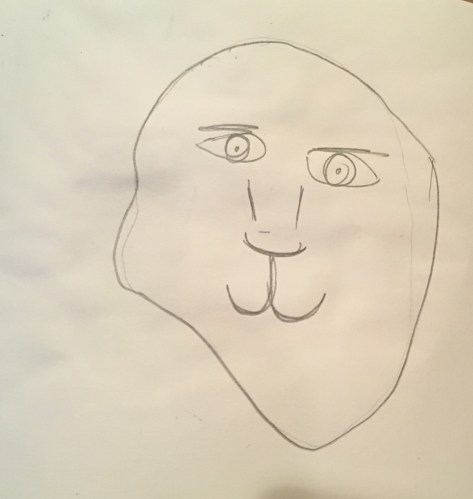
Step 2.
Draw the lions eyes, nose, mouth and ears.
We tried out different shaped eyes and noses. Once the children were happy with their drawings, they outlined them in black sharpie.
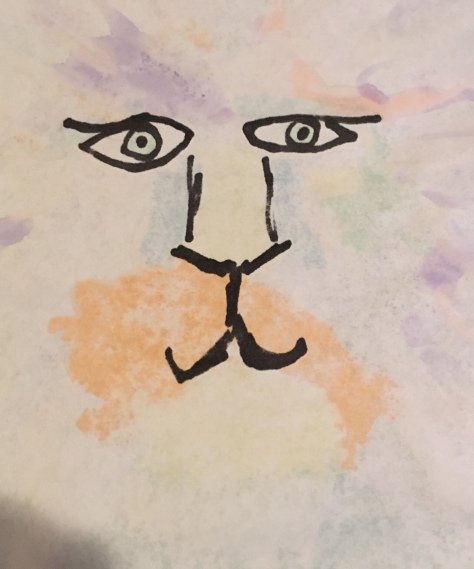
Step 3.
Paint the Mane. I showed them how to make sweeping brushstrokes, starting at the edge of the face and moving outwards. I encouraged them to use lots of bright colours and to try not to mix them too much.
Some used straight lines
Others chose curved lines
And some let the lines move in different directions.
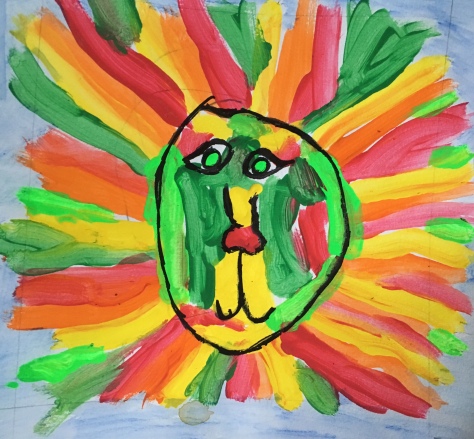
Step 4.
Paint the face. We looked at Neiman’s use of colour – how he used light colours on the nose and chin and darker colours in the shadows. Again, I encouraged them to keep the colours distinct to make a patchwork effect.
Step 5.
Once the paint is dry, outline the features again in sharpie (this helps it to show up when the art work is reproduced by Square 1) and paint a watercolour wash for the background.
This child didn’t want to outline the lion’s face, preferring to let the face and mane merge into one another.
Some chose heart shaped faces
Some filled the whole page with patchwork colour
Some added ears
and some preferred lions without ears.
I love how individual they all are. Bright, bold and full of personality – perfect for a square one art project. I can’t wait to see how they look once their are printed onto keepsakes.
My love for Jim Henson’s creations isn’t a secret. As most children of the 70’s and 80’s, I grew up watching Sesame Street, The Muppets and Fraggle Rock. I love the Muppet Movies new and old, I cried buckets when I watched the documentary ‘Being Elmo’ and my greatest ambition is to sing on Sesame Street some day.
My love affair with puppets began when I was nine years old and bought Snoopy and Charlie Brown marionettes with my Christmas money. I joined the Pelham puppets club, who would send me magazines with short play scripts in them. My granddad made me a wooden puppet theatre with a hand painted back drop and curtains you could open and close. I would perform the plays with my friends and remember making costumes for my puppets and performing a show about a witch for my Brownie pack.
Being an early years teacher, gives me the perfect excuse to continue buying puppets as an adult. I love the way young children respond to puppets and they are invaluable props for my parent and toddler music groups. My girls have inherited most of my collection and added some of their own.
I have been looking forward to the Jim Henson exhibition at MoPop since the summer. We decided to save our visit until the winter when the wet weather often drives us indoors. The Jim Henson Imagination Unlimited exhibition continues until 25th February, so there is still chance to visit.
The first part of the exhibition explains Jim Henson’s early career. Jim Henson started out by manipulating his puppets to sing along to music tracks. At the exhibition, you can choose a puppet, and a track and record the puppets miming along to the music. The girls were totally captivated and loved watching themselves on the screen. It was difficult to drag them away.
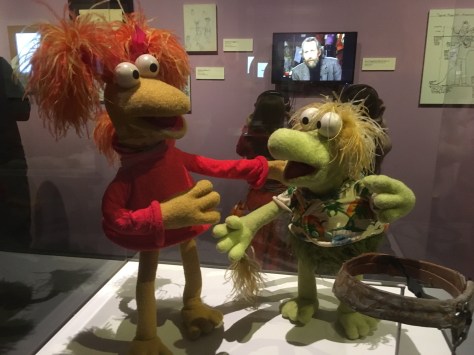
The other sections feature Jim Henson most famous creations. The journey begins with Sesame Street. I was very exited to see Ernie and Bert, Grover and the Count.
The girls learned about the generic blue puppet used in Sesame Street to create multiple characters. The puppet is blank and features are stuck onto the face to change its appearance, according to the requirements of the script. The girls played at creating different characters. We have a similar puppet at home, made by playskool. The girls have made additional features from felt with Velcro attached.
My favourite part of the Muppets section, was a fascinating video explaining how Miss Piggy and Kermit were able to ride bicycles in one of the muppet movies.
The girls loved showing off their theatrical poses and seeing their favourite character, Beaker.
The final section showed exhibits from The Dark Crystal, Labyrinth and Fraggle Rock.
Outside of the exhibition was a muppet stage set up with miniature instruments. You choose your puppet, a piece of muppet music and create your own puppet show. The girls thought this was wonderful and they were surprisingly good at it.
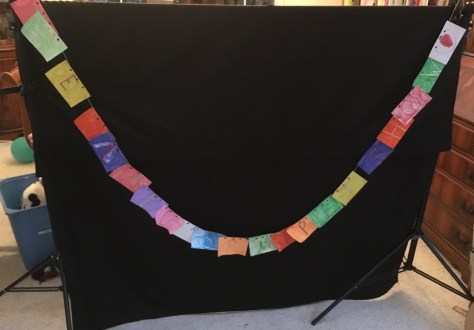
This inspired them to make a puppet show at home. They often make puppet shows on the stairs, peeking over the bannister. This time, we made a screen from our photo backdrop. The girls went to town customising it and spent the next few days writing a muppet show, full of jokes, magic, music and dancing.
My favourite was four puppets singing along to the Pentatonix sugar plum fairy.
The song features Kermit, the wotnot, and one of our favourite puppets, a Melissa and Doug ballerina named Peh .The girls called her Peh because when she dances her hair falls in her face, so to get it out of her eyes, she tosses her head, saying, ‘peh’.
We’re now adding even more to our collection, as I’ve discovered Goodwill online is great place to find unusual puppets at great prices. I’m a little bit hooked. I recently won an amazing Jim Henson puppet ( more on that to come soon).
I love how the puppets have inspired them to create stories, costumes and props. They have also become interested in how puppets are made, what makes a particularly good puppet and how to be a ventriloquist. I’ll share some of their home made puppets in a future post.
Disclaimer: this post contains Amazon affiliate links. If you purchase products via these links, I receive a small compensation.
I used to be a mindfulness sceptic. Being mindful, seemed like a short-term fad, soon to be replaced by another buzz word. My views changed last year, when one of my children had a teacher who promoted mindful activities. My daughter blossomed during that year, from struggling to cope with anxiety when things didn’t go her way, to recognising her emotions were taking over and seeking ways to overcome them. It didn’t stop her rolling her eyes when we talked about being mindful but the strategies helped her to focus, make friends and practice self-control.
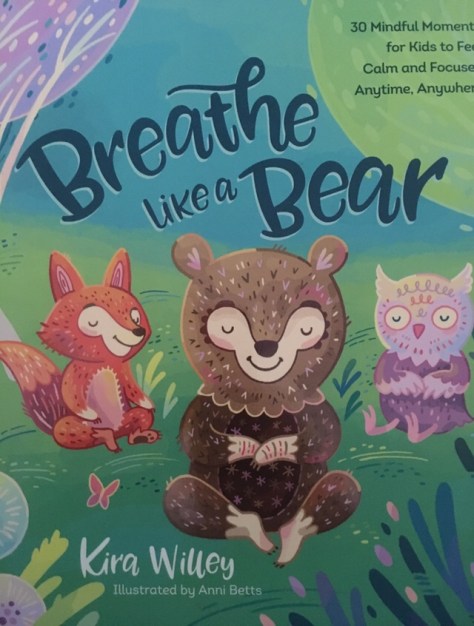
Throwing my scepticism out of the window, I decided to review a new book promoting exercises for children to practice mindfulness, “Breathe Like a Bear”. I’m glad I did, because this really is a great book. It is beautifully presented, resplendent with Anni Betts’ vibrant illustrations and contains a variety of simple, fun exercises that won’t make you feel like you are leading a meditation session. The activities are developmentally appropriate for children young and old and might even be useful visualisations for parents and teachers.
“Breathe like a Bear” is written by Kira Willey, a children’s music artist and kids yoga expert. Kira provides enjoyable, engaging activities children will love. The book’s focus on fun, rather than lots of explanations about the mindfulness message, makes it especially appropriate for young children.
The first section focuses on calming, for when children feel they can’t sit still. It is difficult for children of any age to sit still all day and many children become agitated after a period of time. These exercises are designed to encourage children to slow down. They would be perfect for those days when children have boundless energy but can’t get outside to let off steam. The title “Breathe like a Bear” comes from one such activity. The children pretend they are a hibernating bear, breathing slowly in and out through their noses. Each section has a variety of exercises and encourages you to choose the one you feel most comfortable with. You may need to try a few to find what works best for your child or class.
Section two promotes concentration and focus. There are a mixture of activities in this section. Some are slow visualisations focused on breathing and others involve following actions, movement and sound. I particularly like how varied the activities are.
Section three comprises exercises that stretch the imagination. I think these are my favourites and can imagine using them during a rest time for young children, or to calm an older group when they get noisy or over excited. They would also be useful for bedtime. They could be read to children before they sleep or recorded to play in children’s bedrooms.
Section four is for energising children when they are feeling sleepy or lethargic. These would be great for the start of the day, to wake children up or during a lull later in the day. The exercises include moving your facial muscles, clapping hands, making twisting movements with your body and creating various sounds.
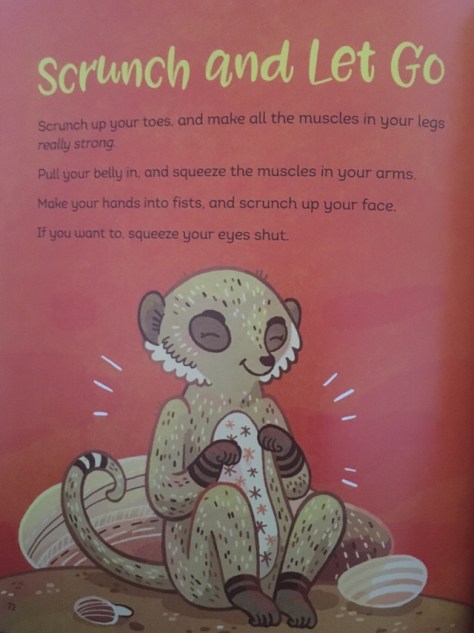
The final section is relaxation for when we are feeling stressed. Stretching like a cat or scrunching and releasing sound deeply satisfying to me.
If mindfulness is your thing, I believe you will love this book. If it isn’t, why not try it anyway? You may become a convert, just like me. My next stop is to investigate Kira Wiley’s music, if it is as beautiful as her book, I’m in for a treat.
Amazon Affiliate link for Amazon US Breathe like a Bear available from Dec 2017 priced $10.99
Amazon Affiliate link for Amazon UK Breathe like a Bear available from 13th January 2018 priced £11.99
Disclaimer: links in this post are affiliate links, meaning if you order via this link I will receive a small percentage of the purchase price. No payment was received for writing this review. I received a complimentary review copy of the title.
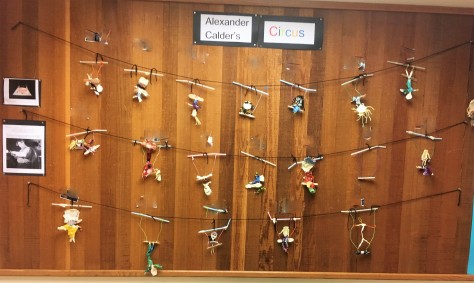
For this months art lesson with third grade, I chose to make wire circus performers inspired by Alexander Calder’s circus. When the children were in 1st grade we made Giacometti inspired wire sculptures. The thicker wire in these sculptures was difficult to bend so I chose thinner wire this time.
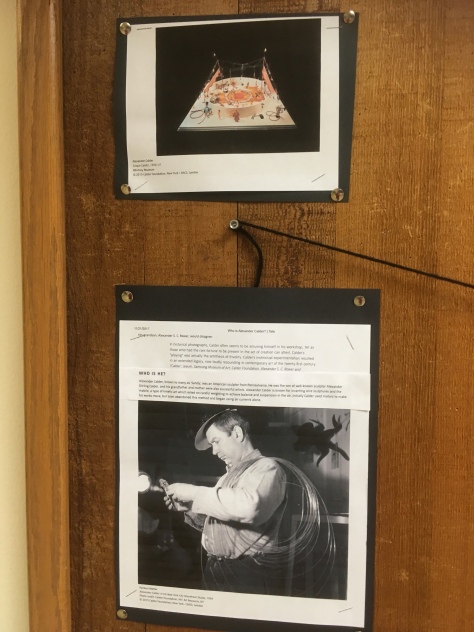
The lesson began with the book Sandy’s Circus by Tanya Lee Stone. This picture book tells the story of Calder’s youth, how he came to enjoy wire sculpture, become an artist and create his moving circus.
The Whitney Museum of American Art have actual video footage of Alexander Calder working his circus. I showed the children this video from 1927, but there are many others.
For our project we made trapeze artists. I thought they would look great on a display especially if we could string them across the classroom.
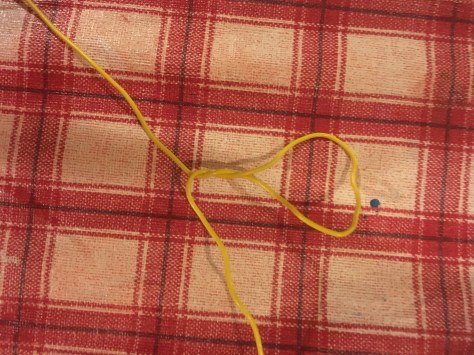
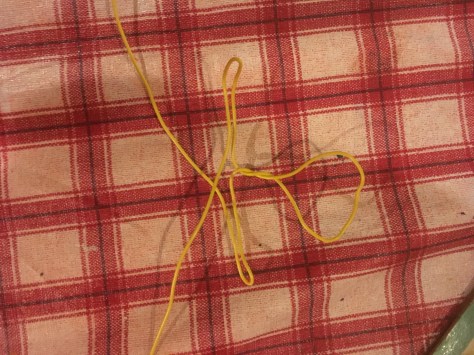
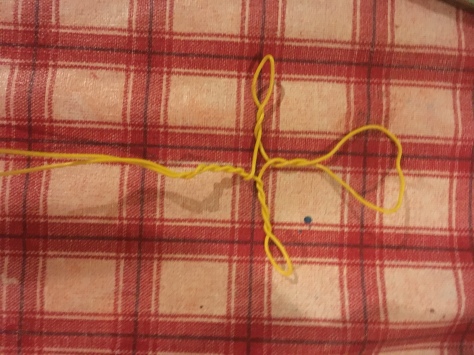
Bend the piece of wire in half and twist the top to create a loop for the head.
2. Fold from half way along the remaining wire towards the centre to make arms.
3. Twist the arms, leaving a loop at the end for hands. Twist part of the remaining wire together to form a body.
4. Open the bottom of the wire out to make legs (cut if too long). Add loops for feet.
5. Cover the surface with masking tape. Add extra layers for padding out specific areas.
Decorating
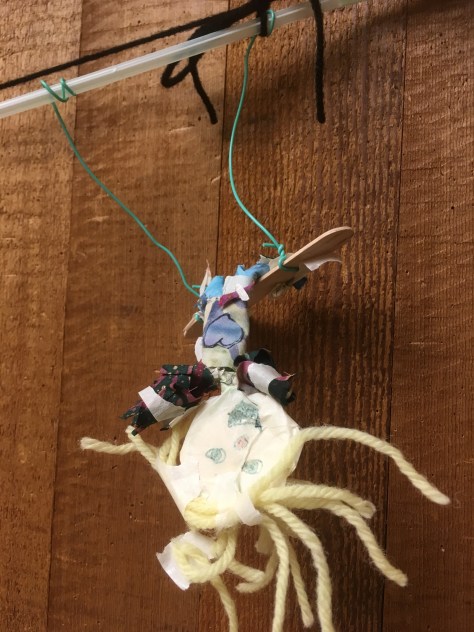
Once the class had made their basic shapes for their trapeze artists, they were given a variety of materials to create, costumes, hair, faces and props. To join the material to their sculpture, some made holes and threaded pieces through, some used tape or glue and some used the wire to wrap around the material, joining it to their circus performer.
Making the Trapeze
Join two pieces of wire to a wooden ice cream spoon and attach to a straw. The children posed their trapeze artists in different positions and we took pictures to remind ourselves of the poses, when we put them on display.
I love the way they turned out and how each child put their individual character into their sculpture. I’d love to have the time to do a full-scale project and create a whole circus. We could investigate different ways of building and making the models move, perhaps with individual groups working on different aspects of movement. Perhaps some of the kids will be inspired to do this at home?
Disclaimer: This post contains Amazon Affiliate links meaning if you purchase an item via these links I receive a small commission.
If you love this lesson, pin to Pinterest for future reference. Other art lessons can be found on my Art Lessons Board
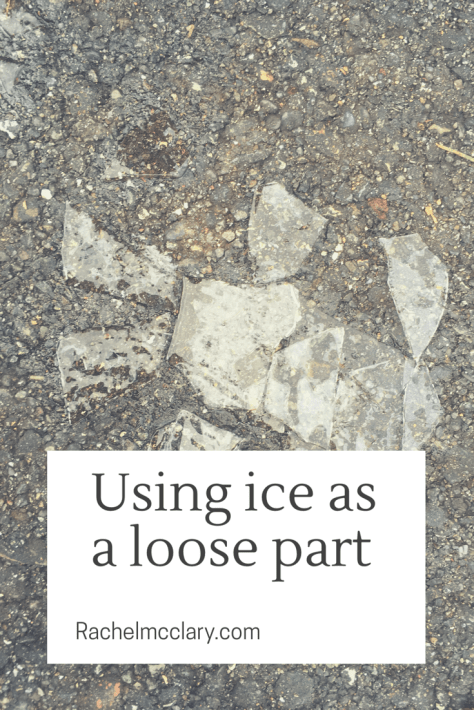
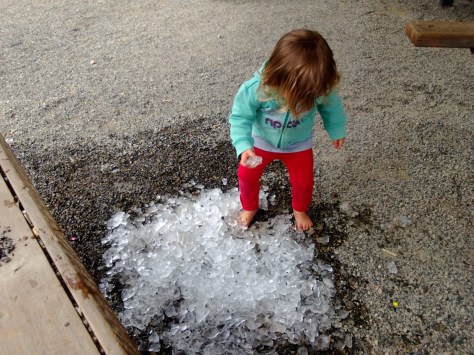
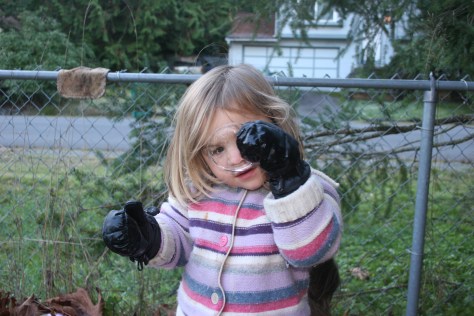
My children are fascinated by ice. I’ve added loose parts to ice before, but never considered that ice could in itself be a loose part.
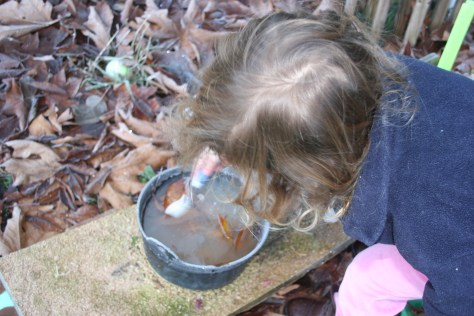
When the cold weather comes, the first thing my kids do is to check if their water table has frozen and any other containers they have left around the garden.
the cauldron has loads of ice in, not like yesterday. How can we break it?
The next thing they like to do is to go to the storm pond near their friends house to see if it has frozen.
Last year it froze solid for the first time. The kids loved throwing sticks to try to break it and even ice skated on it.
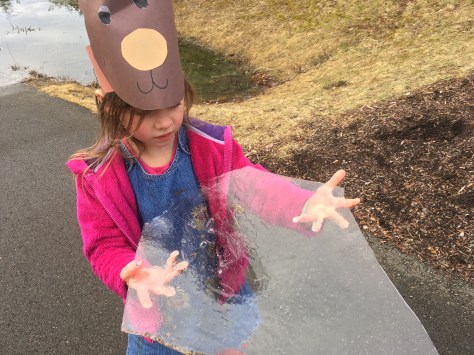
When the ice wasn’t solid enough to walk on, it was just as fascinating.
The children broke off the surface, ice sheets very carefully and had competitions to see who could break the largest piece.
My youngest insisted on carrying pieces home, even though her fingers were numb and left them on the doorstep to see how long they would remain frozen.
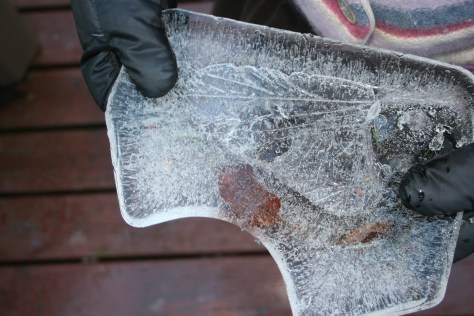
When the pieces broke, they used them to make these pictures.
The children can help create it in different shapes and forms
And is fascinatingly beautiful
I broke this piece – look at all the lovely patterns.
If you don’t live in a cold climate you could make your own in moulds in the freezer or place a few bags of ice outside and see how the children explore.
This piece looks like a magnifier. I can look through it – see.
Last Year in Kindergarten, my art lessons were centred around investigating different art materials. This year, now they are in first grade, we will explore those materials further, whilst learning about the elements of art and introducing new artists.
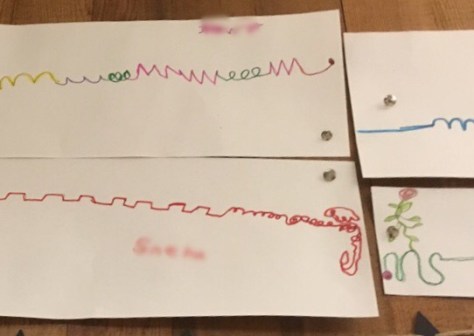
A Lesson about Line
Ask a child to draw a line. The first child I chose drew a bumpy line. The next child drew a straight line.
Discuss different types of lines and introduce the terms horizontal, vertical and diagonal.
Look at how to use the different lines to make shapes, two diagonal lines and a horizontal line make a triangle etc.
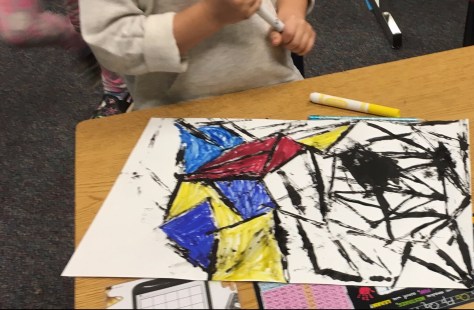
Introduce Mondrian’s paintings. Talk about how he arranged horizontal and vertical lines to make the shapes and sizes he wanted.
It is then time for the children to try their own.
Materials needed
Black tempura paint in a flat tray
A square or rectangle of stiff cardboard
Paper
Show the children how to dip the edge of the cardboard in the paint and remove any excess paint by dabbing it on the tray.
Show them how to print lines on the paper in different arrangements to make shapes. Though Mondrian only used horizontal and vertical lines, the children in my class were also allowed to use diagonal lines in their compositions.
3. While the children print, talk to them about the shapes and arrangements they have made. Remind them to close up their shapes so they can be coloured later. As Hallowe’en was looming, spider webs were particularly popular.
Making a Fancy Line
While we waited for the paint to dry, we talked a little more about lines. We looked at a sketch and found the different types of lines used in the picture.
The next challenge was to make one long line, composed of five different types of lines, without taking their pencil off the paper.
I demonstrated them some examples.
They tried their own in pencil and then went over their lines in marker. Some children had difficulty making a single line and wanted to join it to make a shape. For those that did this I encouraged them to focus on the line by outlining it in marker without filling in any colour in the centre.
Mondrian and Primary Colours
Look at Mondrian’s compositions again. How does he use colour?
Talk about primary colours, what they are and why are red, blue and yellow the primary colours?
Look at how Mondrian paintings used primary colours to shade some of the shapes in his compositions.
The second part of the project
Ideally, I would leave the black paint overnight to dry. We have limited time for art so this was not possible and some of the paint was still wet. We blotted the worst of the paint off with a tissue.
Materials
Red, yellow and blue markers (you may also want to include black)
What to do
Use the markers to fill in some of the shapes, leaving some of them white. Try to fill in each shape with solid colour and not leave any gaps so they look like Mondrian’s compositions.
The Finished Products
If you like this lesson and you’d like to save the idea, use this image to save it to Pinterest. You can find my other art lessons and those that inspire me, on my Art lessons for Kids Pinterest Board or art activities for home and free play on my art and craft for kids board.
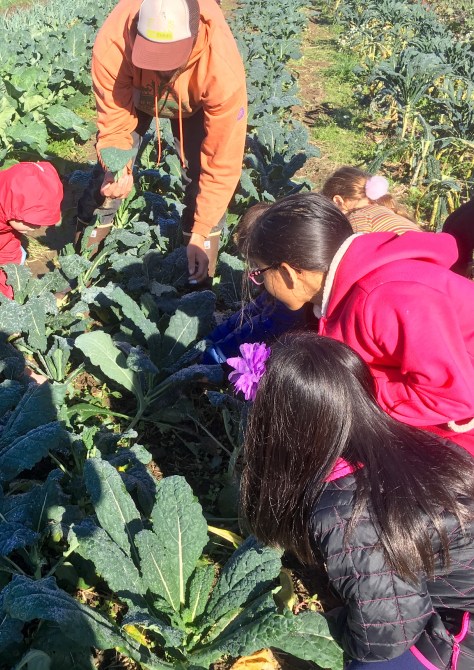
Oxbow Farm is my favourite place for field trips. The guides are wonderfully entertaining and keep the kids motivated with songs, movement, challenges and a fast paced, hands-on journey through the farm.
The children learn about the farm plants and have an opportunity to investigate, pick and taste everything, whilst being shown respect for the plants and their environment.
They eat leafy plants being careful not to stand on the plants.
Snap off a whole Kale leaf and eat it. “It tastes like broccoli”
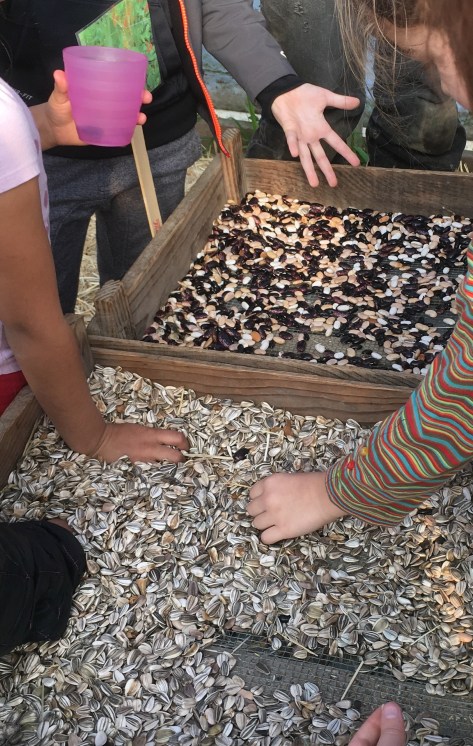
They eat seeds, learning about where the seeds come from, how they are spread and dried out in the greenhouse.
The children collected bean pods in the garden, split the pods and brought the seeds to dry in the greenhouse
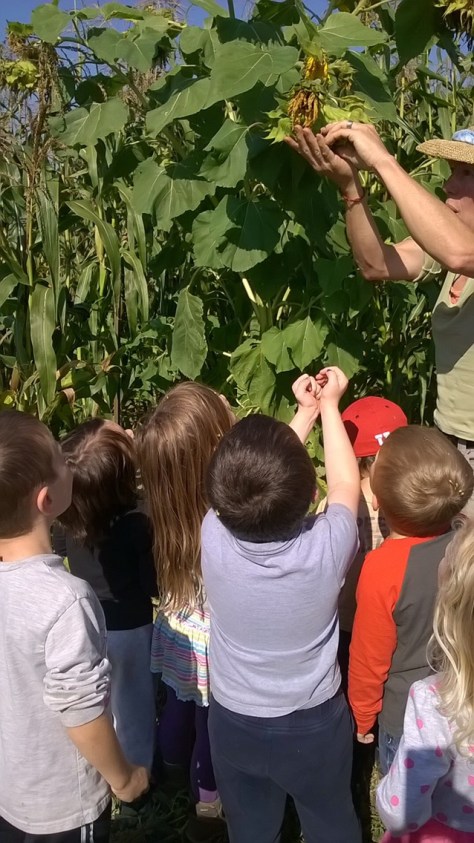
They eat stems. We found tiny celery sticks to try.
They eat flowers. We ate small yellow flowers that tasted like licquorice.
They eat fruit. We ate juicy apples from the tree and found the seeds inside them.
They eat roots. We pulled salad turnips and carrots from the ground, washed them and ate them.
I love the simplicity of I Am Bat. I can easily hear it being read in my own child’s voice and see her acting out and reciting the text as she does with Elephant and Piggie books. Bat is over dramatic in a similar way to Elephant and this really appealed to my kids. The illustrations evoke the bat’s emotions perfectly. A wonderful book for younger readers.
As a parent of 3 children, I love Middle Bear. It is heartwarming and uplifting without being overly sentimental and conveys perfectly the mediocrity of being a middle child. I love the shell-shocked/glazed expression of the bear and the use of child like illustrations, as they convey perfectly his perception of himself as unremarkable. As the story unfolds, middle bear find out that there are some things he is just perfect for. I loved the way this unfolded and it made me smile. A perfect book for middle children everywhere.
A book by Michael Rosen about stealing chocolate cake. What isn’t there to like? The sumptuous use of onomatopoeia and descriptive language makes it a perfect book to use in the classroom. Chocolate Cake would provide lots of inspiration for children developing their descriptive writing and would be a great opening to language and vocabulary lessons. I love the way the typeface changes to enhance the descriptive words as they work seamlessly with the pictures. The illustrations are atmospheric and the boy’s expressive eyes are skillfully drawn to show every emotion throughout the book. (currently only available in the UK).
Disclaimer – Amazon links are affiliate links, meaning I receive a small commission if you order via these links.
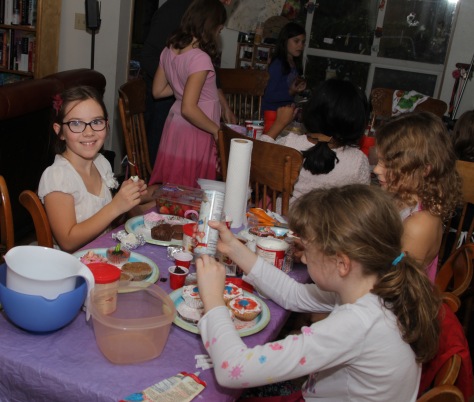
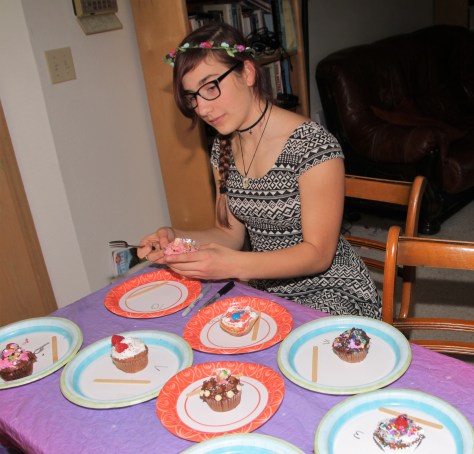
My kids are huge Great British Bake Off fans so my daughter chose a bake-off themed party for her 9th birthday. The idea of ten children all baking together at the same time was a little daunting but I needn’t have worried. I think this was probably one of the most successful parties I have organised.
Planning
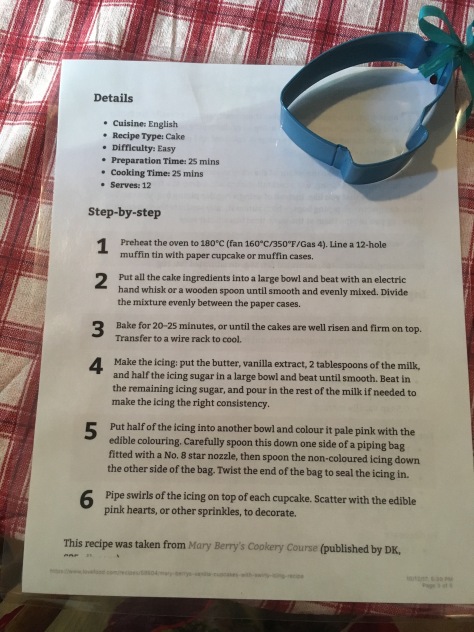
I decided on a basic Mary Berry cupcake recipe to be in keeping with the show.
I bought mixing bowls from the thrift store/charity shop and a pack of wooden spoons so each child would have their own utensils.
I pre-measured the ingredients for making 4 cupcakes and placed the dried ingredients in a ziplock bag. In the bowl, I placed the pre- measured butter and an egg.
Recipe for 4 cupcakes
60g self-raising flour
60g caster (baking) sugar
half a teaspoon of baking powder
60g butter at room temperature
1 egg.
Mix all the ingredients in a bowl until smooth. Spoon into cases and bake for 25 mins at 350 F/ gas mark 4.
The Competition
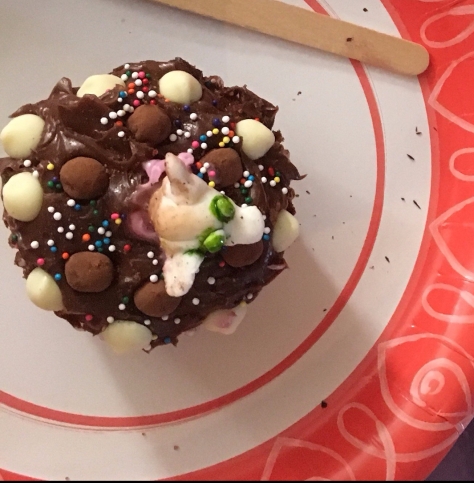
The competition was to add additional ingredients to their cupcake recipe to make a unique cupcake and to decorate it with their individual designs.
Additional ingredients to choose from
raisins
chocolate chips (milk and white)
dried cranberries
dried cranberry and orange
dried blueberries
caramel pieces
shredded coconut
cinnamon
cocoa powder
raspberries
blackberries
vanilla essence
peppermint flavouring
almond essence.
The children’s names were written on the bottom of the paper case before they went in the oven.
While the cakes were baking, we played pass the parcel and had some British snacks like cheese and pineapple and chocolate digestives.
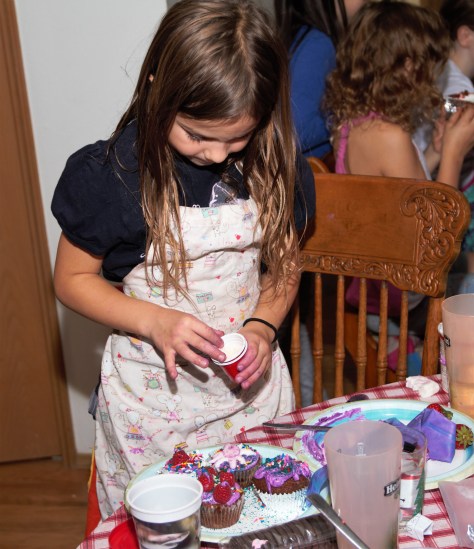
For the decorating stage – they had ready-made frosting (soft icing) and a selection of items to decorate.
food colouring
piping bags
sprinkles/hundreds and thousands
fruit
chocolate chips
fondant icing
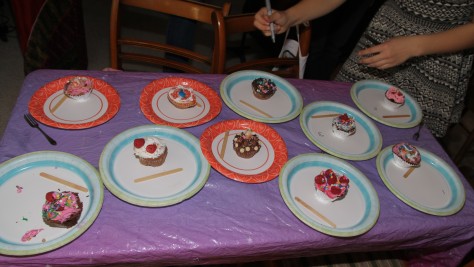
Each child chose their favourite cupcake for the judging stage. The cupcakes were given a number but the judges didn’t know who the cupcakes belonged to.
The judges awarded 3 prizes.
Best Decorated
Best Tasting
Best Overall Cupcake
Judging was very interesting ( and amusing). Some were very sweet or had overpowering flavours. I loved the comment from one of the girls, when they were sampling their finished cupcakes.
“My cupcake definitely won’t win best tasting, it tastes like toothpaste!”
The winners were awarded a prize and all the children took their cupcakes home along with a recipe card and a teapot cookie cutter.
The above party was hosted for 10 children. There were 3 adult helpers, 2 cake testers and the party lasted for 3 hours.


 If you like this lesson and you’d like to save the idea, use this image to save it to Pinterest. You can find my other art lessons and those that inspire me, on my